When i first started Star Conflict back in the Beta i loved Guards but they lacked something, they were slow, bulky, felt really hard to control in comparison so pretty much any other frigate with the recent buffs to the Guard resistances and buffs i started playing them again almost exclusively for a simple reason, Guards are a very versatile, extremely tanky, yet extremely dangerous ship class capable of fighting for long periods of time due to their unique ability of attuning to the three damage types and making any damage of that type rather negligible and more important, sustainable.
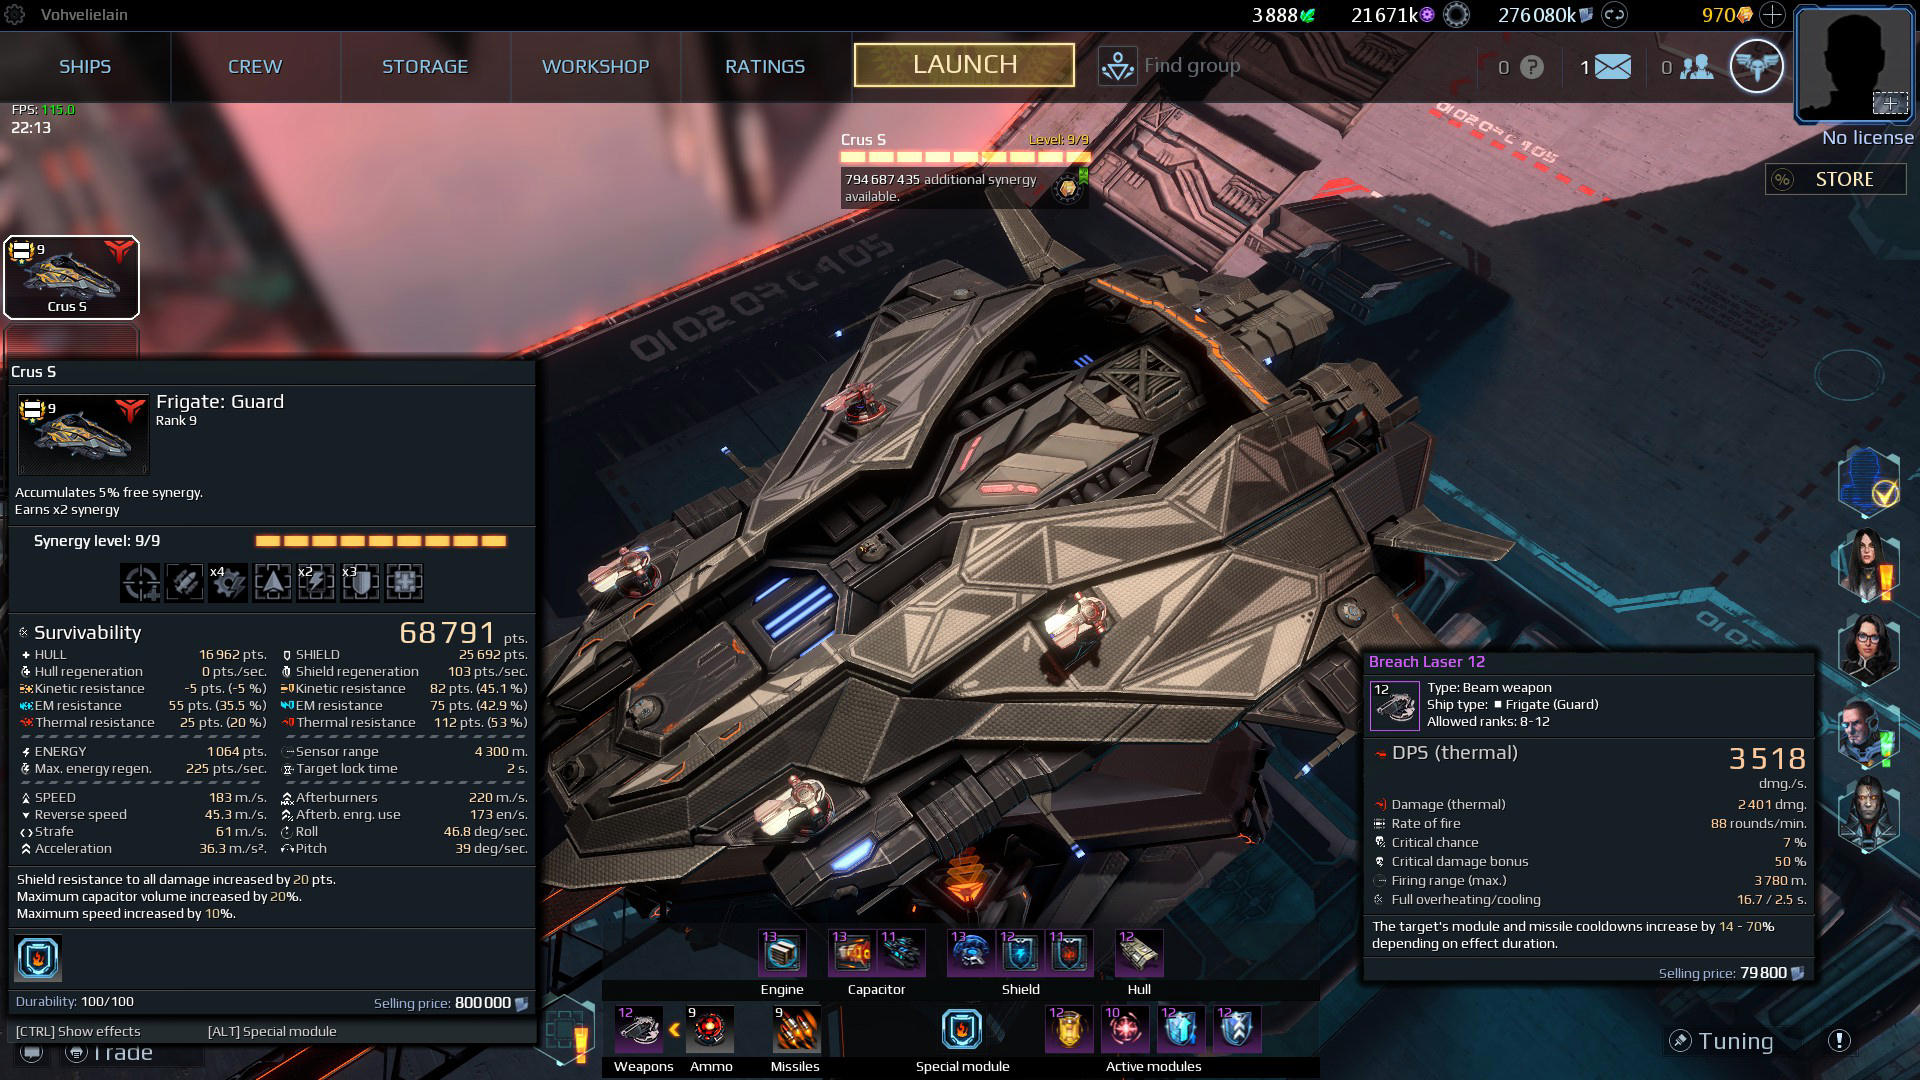
Without further ado i’d like to present you my current Crus S Guard build. It’s versatile and offers options.
- - Stats
- - Weapons
- - Equipment
- - - Ammo
- - - Missiles
- - - Modules
- - - Modifications
- - Crew
- - Ups
- - Downs
- - Game Types
- - Game Modes
- - How To
Why the Crus S rather than the Blood Tormentor? I don’t have a Blood Tormentor and i don’t like it either, it’s mod slots disgust me although the seemingly bigger shield capacity and the 10% damage boost is nice.

Stats:
![]() 20331 Hull Points @
20331 Hull Points @ ![]() 200/s Passive Guard Regeneration (after 5s) - Enough to withstand quite some punishment should your shields fail.
200/s Passive Guard Regeneration (after 5s) - Enough to withstand quite some punishment should your shields fail.
![]() 35969 Shield Points @
35969 Shield Points @ ![]() 103/s Shield Regeneration - This is your actual life, treat it as such. Is your shield down you’re technically dead.
103/s Shield Regeneration - This is your actual life, treat it as such. Is your shield down you’re technically dead.
![]() 1064 Energy @
1064 Energy @ ![]() 212/s Energy Regeneration - A decent energy pool with enough regen to keep you boosting forever out of combat should you choose to do it rather than attunement switch-buffing.
212/s Energy Regeneration - A decent energy pool with enough regen to keep you boosting forever out of combat should you choose to do it rather than attunement switch-buffing.
![]()
![]()
![]() Hull Resistances - Slightly boosted hull resistances, not that they will help you much but all negative ones are eliminated.
Hull Resistances - Slightly boosted hull resistances, not that they will help you much but all negative ones are eliminated.
![]()
![]()
![]() Shield Resistances - They are set to be balanced around negating any negative resistances (
Shield Resistances - They are set to be balanced around negating any negative resistances ( ![]() EM) and covering the most common damage type used for most high-damage weapons and missiles.
EM) and covering the most common damage type used for most high-damage weapons and missiles.
![]() 183 ~ 350m /s Speed - Slightly improved speed due to the level 8 boost allowing us to go up to 350+ m/s with the shield attunement speed buff.
183 ~ 350m /s Speed - Slightly improved speed due to the level 8 boost allowing us to go up to 350+ m/s with the shield attunement speed buff.
![]()
![]() Rotation Speeds - Massively improved because otherwise your guard is really just a flying fortress and can’t turn, this is important to keep up with faster ships, though won’t be too effective on close range.
Rotation Speeds - Massively improved because otherwise your guard is really just a flying fortress and can’t turn, this is important to keep up with faster ships, though won’t be too effective on close range.
Weapon:
Option A: ![]() Vulcan - My personal new favorite. Meet the Vulcan. You’ll be a rusher, a close-mid range gunner and you’ll deal massive damage to anything not fast enough to dodge bullets or outright outtank it like you do. Anything that can’t dodge it and has less than 50% kinetic resistance will be in big trouble.
Vulcan - My personal new favorite. Meet the Vulcan. You’ll be a rusher, a close-mid range gunner and you’ll deal massive damage to anything not fast enough to dodge bullets or outright outtank it like you do. Anything that can’t dodge it and has less than 50% kinetic resistance will be in big trouble.

Option B: ![]() Mass Driver - My previous favorite before i had the luck to get a Vulcan together. Deals decent, mostly constant damage and gets harder to dodge the longer you hold the trigger. Quickly becomes ineffective with higher resistances due to the lack of crit chance.
Mass Driver - My previous favorite before i had the luck to get a Vulcan together. Deals decent, mostly constant damage and gets harder to dodge the longer you hold the trigger. Quickly becomes ineffective with higher resistances due to the lack of crit chance.

Option C: ![]() Coil Mortar - I love this thing. It makes pew pew, boom boom, and everything explodes and it does deal quite some damage quite fast… although not on the guard. In fact, in my opinion this thing is a full frontal crash against a wall on anything but a Long Range Frigate due to its slow fire rate, not even the explosion range and proximity detonation makes up for it. You can use it if you want more range and AOE booms but i do not recommend it unless you can stand slow fire rate and being practically unable to fire at anything at a slight angle due to the weapon firing in cycles per turret, wasting 3 heat cycles and firing once every 4 times you’d normally shoot… or you use one of those hardcore coil mortar crit builds which again would probably be better on a LRF because 50% more firerate at the cost of survivability.
Coil Mortar - I love this thing. It makes pew pew, boom boom, and everything explodes and it does deal quite some damage quite fast… although not on the guard. In fact, in my opinion this thing is a full frontal crash against a wall on anything but a Long Range Frigate due to its slow fire rate, not even the explosion range and proximity detonation makes up for it. You can use it if you want more range and AOE booms but i do not recommend it unless you can stand slow fire rate and being practically unable to fire at anything at a slight angle due to the weapon firing in cycles per turret, wasting 3 heat cycles and firing once every 4 times you’d normally shoot… or you use one of those hardcore coil mortar crit builds which again would probably be better on a LRF because 50% more firerate at the cost of survivability.

Equipment:

Ammo:
_ Option A: _ Vanadium Shells - Pretty obvious why. Straight up making our Vulcan fire even faster, giving it negligible more spread and making it overheat faster which is exactly what we want, the weapon gains crit chance with increased heating, faster overheating means getting your high crit chance fast and keeping it there a lot easier. The Vulcan has extremely fast cooldown, letting go for a moment when reaching maximum heat to reduce spread but keeping roughly 50-60% heat is what you’re going to do for 2000-3000m distance and smaller targets.
_ Option B: _ Shaped Charge Shells - While i’d not necessarily recommend it as the Vulcan has already high crit chance to begin with it is still a small damage boost although not as solid as Vanadium Shells due to 14% more firerate. RNG is not good. At 40% crit chance weapons start to crit a lot, especially fast hitting weapons. This however is a better suited option for Coil Mortar crit builds
_ Option C: _ Uranium Shells - If you have problems hitting dodging targets, you could use these at the cost of 10% of your damage. By default the Vulcan has decently fast bullets with 5000m/s.
Missiles:
Ultimately these come done to personal preference but…
_ Option A: _ ![]() Octopus - 5 Missiles fired in succession each hitting with roughly 2000 Kinetic Damage, decent burst damage against frigates and unaware fighters/interceptors and quite heavy damage on destroyers.
Octopus - 5 Missiles fired in succession each hitting with roughly 2000 Kinetic Damage, decent burst damage against frigates and unaware fighters/interceptors and quite heavy damage on destroyers.
_ Option B: _ ![]() Cruise Missile - Plain simple old thermal missiles, EXTREME range, good for annoying and sniping open targets but its range is also highly useless unless you can target someone over 6k range which in most cases you can’t.
Cruise Missile - Plain simple old thermal missiles, EXTREME range, good for annoying and sniping open targets but its range is also highly useless unless you can target someone over 6k range which in most cases you can’t.
_ Option C: _ ![]() Anomaly Generator - Everyone’s best friend. Hit-scan with a wind-up, massive EM damage, extremely dangerous for destroyers, unaware LRF and a nice surprise for other Guards.
Anomaly Generator - Everyone’s best friend. Hit-scan with a wind-up, massive EM damage, extremely dangerous for destroyers, unaware LRF and a nice surprise for other Guards.
I’d recommend Octopus if you want hard-to-avoid volleys of missiles like me, Cruise Missile if you simply want long range non-kinetic damage for Guards especially and Anomaly Generator for those mid-long range quick-succession MLG 360 noscope snipe surprises.
_ Option D: _ (_terrorblade’s suggestion): ![]() Torpedo - Some people might prefer the Torpedo over the Anomaly Generator for close range bombing, it has the added bonus of not locking your movement in place to fire it and doesn’t have a windup but is unguided. Would not recommend unless you are a skilled player. Note that unguided missiles still come out from below your ship and fly towards where you aimed at, this can be used for trickshots around corners.
Torpedo - Some people might prefer the Torpedo over the Anomaly Generator for close range bombing, it has the added bonus of not locking your movement in place to fire it and doesn’t have a windup but is unguided. Would not recommend unless you are a skilled player. Note that unguided missiles still come out from below your ship and fly towards where you aimed at, this can be used for trickshots around corners.
Modules:
_ Actives: _
Slot 1
Option A:![]() Energy Converter 10 - This thing is your first and your last word. Destroyer giving you a broadside? Answer with Energy Converter, let him eat his own broadside. Multiple people shooting at you while you’re battling it out with another Guard? Energy Converter! Pesky little interceptor or Tharga deadzoning you? Energy Converter! Energy Converter is unbelievably strong and unbelievably unreliable and random at times. This thing makes or breaks your everything. You either hit or you die in vein, make it count. Make sure to mount it on slot 1, don’t make the same mistake i did and mount it on 3/4 (your wings) and suffer an ugly offset aiming bug. Use rank 10 if you can’t get the 13, its strength is the same, 8 points more resistances baseline is not going to help you, the only reason you want 13 is for that sweet 2 second reduced baseline cooldown.
Energy Converter 10 - This thing is your first and your last word. Destroyer giving you a broadside? Answer with Energy Converter, let him eat his own broadside. Multiple people shooting at you while you’re battling it out with another Guard? Energy Converter! Pesky little interceptor or Tharga deadzoning you? Energy Converter! Energy Converter is unbelievably strong and unbelievably unreliable and random at times. This thing makes or breaks your everything. You either hit or you die in vein, make it count. Make sure to mount it on slot 1, don’t make the same mistake i did and mount it on 3/4 (your wings) and suffer an ugly offset aiming bug. Use rank 10 if you can’t get the 13, its strength is the same, 8 points more resistances baseline is not going to help you, the only reason you want 13 is for that sweet 2 second reduced baseline cooldown.
Option B: USE ENERGY CONVERTER, ITS WHAT MAKES THIS BUILD … WELL THIS - But seriously, if you don’t have the energy converter you can use the ![]() Mass Propulsion Inhibitor 12 or
Mass Propulsion Inhibitor 12 or ![]()
![]()
![]() Signature Masking 13, depending on if you want to slow enemies down or weaken them. Personally i’d recommend
Signature Masking 13, depending on if you want to slow enemies down or weaken them. Personally i’d recommend ![]()
![]()
![]() Signature Masking 13 because slowing a 500-700m/s interceptor or Tharga by 20% is not going to save you but then again 13% less damage in 2000m range isn’t either against those but it is a nice buff regardless and can be activated to increase it to 56% which on top of your massive shield and shield resistances is a big buff.
Signature Masking 13 because slowing a 500-700m/s interceptor or Tharga by 20% is not going to save you but then again 13% less damage in 2000m range isn’t either against those but it is a nice buff regardless and can be activated to increase it to 56% which on top of your massive shield and shield resistances is a big buff.
_ Option C: _ ![]() Hull Restoration System 12 - This is a new addition since 1.5.1 and is a nice backup for when you don’t have an energy converter or if you’re playing open space or PvE missions. It can provide a massive tank bonus too in PvP Team Deathmatches if you can get a few seconds out of fire which shouldn’t be hard there. Get 10 seconds and you’re topped up on hull again and you can use your Shield Booster too to recharge some shields while you recover.
Hull Restoration System 12 - This is a new addition since 1.5.1 and is a nice backup for when you don’t have an energy converter or if you’re playing open space or PvE missions. It can provide a massive tank bonus too in PvP Team Deathmatches if you can get a few seconds out of fire which shouldn’t be hard there. Get 10 seconds and you’re topped up on hull again and you can use your Shield Booster too to recharge some shields while you recover.
Slot 2
![]() Shield Booster L 12 - This is your bones (without meat), without it you are nothing, less than nothing, you’ll have a hard time recovering from any damage effectively. This thing alone will keep you alive for another 8 seconds while being fired at by 3-5 people. Can be mounted on any slot.
Shield Booster L 12 - This is your bones (without meat), without it you are nothing, less than nothing, you’ll have a hard time recovering from any damage effectively. This thing alone will keep you alive for another 8 seconds while being fired at by 3-5 people. Can be mounted on any slot.
Slot 3
Option A:![]() Pulsar 12 - Your second line of offensive defense, mostly used for eager-to-die interceptors and fighters, make em pay getting into 2000m range of you (besides shooting at them of course).
Pulsar 12 - Your second line of offensive defense, mostly used for eager-to-die interceptors and fighters, make em pay getting into 2000m range of you (besides shooting at them of course).
Option B:![]() A1MA 13 - I heard it’s nice, another (permanent) way of punishing foes for coming close. I’d probably use it, if i had it.
A1MA 13 - I heard it’s nice, another (permanent) way of punishing foes for coming close. I’d probably use it, if i had it.
Slot 4
![]() Emergency Shield Booster 12 - This thing is absolutely rads, with the massively decreased cooldown being almost as fast as the Shield Booster its a substantial survivability boost and basically the meat on your bones. This thing can keep you alive for 20 seconds while being actively fired at by multiple people. I can’t count the times i was sitting in an enemy spawn surrounded by the entire enemy team and i was melting through that destroyer while everyone was shooting me, trying to prevent the inevitable death of said destroyer. Sure, it won’t save you in this case but at least you got that destroyer down. Sacrificing yourself to kill off a destroyer is still better than dying for nothing, he’ll have a harsh 40 second respawn time and you’ll be back in no time, this reduces the enemy team size for a good amount of time and adding additional pressure on it especially when you’re back for more shooting shortly after dying.
Emergency Shield Booster 12 - This thing is absolutely rads, with the massively decreased cooldown being almost as fast as the Shield Booster its a substantial survivability boost and basically the meat on your bones. This thing can keep you alive for 20 seconds while being actively fired at by multiple people. I can’t count the times i was sitting in an enemy spawn surrounded by the entire enemy team and i was melting through that destroyer while everyone was shooting me, trying to prevent the inevitable death of said destroyer. Sure, it won’t save you in this case but at least you got that destroyer down. Sacrificing yourself to kill off a destroyer is still better than dying for nothing, he’ll have a harsh 40 second respawn time and you’ll be back in no time, this reduces the enemy team size for a good amount of time and adding additional pressure on it especially when you’re back for more shooting shortly after dying.
Modifications:
_ Engine: _
Slot 1
![]()
![]() Vernier Engines 13 - You’re bulky and you turn like an Anaconda in Elite Dangerous, you’ll need this to offset your slow rotation speeds, this also makes navigating and turning to any threat quickly much easier without bumping into everything.
Vernier Engines 13 - You’re bulky and you turn like an Anaconda in Elite Dangerous, you’ll need this to offset your slow rotation speeds, this also makes navigating and turning to any threat quickly much easier without bumping into everything.
Note: Everything else is wasted, you don’t need cooling speed, you don’t need even more speed either and you don’t need the collision dampener too as it only lowers instead of fully negating collision damage.
_ Capacitor: _
Slot 1
Iridium Heatsink 13 - More firerate, faster overheat. Both you want. More firerate = more damage per second and more overheat = more potential crits = more potential damage.
Slot 2
![]() Voltage Regulator 12 - Increased energy regeneration because we can need it, we can sustain the emergency shield booster easier and longer out of range and we can boost infinitely.
Voltage Regulator 12 - Increased energy regeneration because we can need it, we can sustain the emergency shield booster easier and longer out of range and we can boost infinitely.
Note: Emergency Barrier is trash, ![]() Leak Stabilizer won’t help you as you have enough max energy,
Leak Stabilizer won’t help you as you have enough max energy, ![]()
![]()
![]() Pulse Discharger reduces energy regeneration, Acceleration Coils is unneeded as the Vulcan fires fast enough (might be useful on Coil Mortar though) and the
Pulse Discharger reduces energy regeneration, Acceleration Coils is unneeded as the Vulcan fires fast enough (might be useful on Coil Mortar though) and the ![]() Power Unit Conduit increases speed minimally at the cost of max energy. All of which we really don’t want.
Power Unit Conduit increases speed minimally at the cost of max energy. All of which we really don’t want.
_ Shield: _
Slot 1
![]() Shield Splitter 13 - Obvious isn’t it? You are a guard, you are Jericho, of course you want more shields. Your shield is your life, your shield is love, show em Federation freaks that you can’t be a proper guard without massive amounts of them!
Shield Splitter 13 - Obvious isn’t it? You are a guard, you are Jericho, of course you want more shields. Your shield is your life, your shield is love, show em Federation freaks that you can’t be a proper guard without massive amounts of them!
Slot 2
![]() Thermal Modulator 11 - Plain and simple thermal resistance because most hard hitting weapons such as lasers and missiles (also guided torpedoes and snipers) deal thermal damage and you can’t have your shield attuned to it all day, your priority will be blocking hard hitting EM damage.
Thermal Modulator 11 - Plain and simple thermal resistance because most hard hitting weapons such as lasers and missiles (also guided torpedoes and snipers) deal thermal damage and you can’t have your shield attuned to it all day, your priority will be blocking hard hitting EM damage.
Slot 3
![]() EM-diffuser 12 - Which brings us to the
EM-diffuser 12 - Which brings us to the ![]() EM-diffuser, even with the recent resistances buff Jericho Guards still have negative EM resistances, we need to fix this or we’re toast.
EM-diffuser, even with the recent resistances buff Jericho Guards still have negative EM resistances, we need to fix this or we’re toast.
Note: You could switch in ![]() Variative Shield Projector for some kinetic resistance depending on what you do though kinetic is the least dangerous damage type you’ll encounter.
Variative Shield Projector for some kinetic resistance depending on what you do though kinetic is the least dangerous damage type you’ll encounter. ![]() Multipurpose Shields would be another honorable mention as it blocks collisions with your shields and prevents shield penetrating weapons from circumventing your entire class, on top it increases your shield volume by an additional 17%, but… we got the crew for that. Shield regen is worthless as your baseline regen is way too low to begin with and the only other interesting mod would be the
Multipurpose Shields would be another honorable mention as it blocks collisions with your shields and prevents shield penetrating weapons from circumventing your entire class, on top it increases your shield volume by an additional 17%, but… we got the crew for that. Shield regen is worthless as your baseline regen is way too low to begin with and the only other interesting mod would be the ![]()
![]()
![]() Adaptive Shield, although at the cost of one of your slots, most likely
Adaptive Shield, although at the cost of one of your slots, most likely ![]() EM-diffuser though since you can offset it with your special ability and gain resistances on all types.
EM-diffuser though since you can offset it with your special ability and gain resistances on all types.
_ Hull: _
Slot 1
![]() Regenerative Coating 11 - Honestly, this slot is pretty useless. Although per xKostyan’s suggestion you can swap in
Regenerative Coating 11 - Honestly, this slot is pretty useless. Although per xKostyan’s suggestion you can swap in ![]() Reinforced Beams here for any non PvE game mode and switch the first Crew to get resistances rather than extra hull. You could also use
Reinforced Beams here for any non PvE game mode and switch the first Crew to get resistances rather than extra hull. You could also use ![]()
![]()
![]() Crystal Plates because the Guard can repair itself after 5 seconds of not using a module with whopping 200 hull/s. I don’t have
Crystal Plates because the Guard can repair itself after 5 seconds of not using a module with whopping 200 hull/s. I don’t have ![]()
![]()
![]() Crystal Plates so i’m not using it but i found the latter being pretty okay for PvP and Coop, although i still prefer
Crystal Plates so i’m not using it but i found the latter being pretty okay for PvP and Coop, although i still prefer ![]() Regenerative Coating for PvE.
Regenerative Coating for PvE.
_ CPU: _
Slot 1
‘Horizon’ Module 13 - We all know why this newly added slow needs this module, our weapon is deadly but has a less deadly range, with this we’re making it much more dangerous. This boosts our range to roughly 3.7km, that’s a decent range for the Vulcan. Note this reduces your damage by 5%.
Slot 2
Option A: ‘Proton Wall’ System 11 - I chose this module mainly for PvP as you’re going to get disabled a lot, this module reduces CC times by 40% that is a lot. A disabled guard is a dead guard. You could exchange this for another ‘Horizon’ Module 13 if you need more range or for Electronic Guidance 13 if you need spread reduction for Mass Driver for example.
Option B: ‘Horizon’ Module 13 - As said above this would be another option if you play PvE or Coop or Spec Ops since there isn’t much CC going on.
Option C: Electronic Guidance 13 - Another option for weapons with a lot of spread, Coil Mortar and Mass Driver especially would gain a lot from this.
Crew:

1 - ![]()
![]()
![]() Neurocontroller ‘HR1 - SE’ - 20 points resistances to all damage types, with the reinforced hull beams slotted in Hull we can negate the loss for not taking 25% more hull, we even gain 3% and get some resistances, not that they will help us much. Remember, shieldless guard is a dead guard literally and figuratively.
Neurocontroller ‘HR1 - SE’ - 20 points resistances to all damage types, with the reinforced hull beams slotted in Hull we can negate the loss for not taking 25% more hull, we even gain 3% and get some resistances, not that they will help us much. Remember, shieldless guard is a dead guard literally and figuratively.
2 - ![]()
![]()
![]() Neurocontroller “Occulus” - 10% Crit chance flat on top. Nice damage boost. This is the part-crit-build approach. You can use “Albatross” if you want a bit more range although 20% is not going to cut it or much better.
Neurocontroller “Occulus” - 10% Crit chance flat on top. Nice damage boost. This is the part-crit-build approach. You can use “Albatross” if you want a bit more range although 20% is not going to cut it or much better.
3 - ![]() Neurocontroller “Owl” - 35% shield volume because Jericho. We can’t have enough of that sweet regenerating blue life force. This makes smart shield attunement play absolutely essential. DONT use regen, its not worth it. “SR Mark 2” is nice though if you want to stack more resistances for a “safer” less skilled approach, do not recommend.
Neurocontroller “Owl” - 35% shield volume because Jericho. We can’t have enough of that sweet regenerating blue life force. This makes smart shield attunement play absolutely essential. DONT use regen, its not worth it. “SR Mark 2” is nice though if you want to stack more resistances for a “safer” less skilled approach, do not recommend.
4 - Alpha-Inhibitor “RR-25” - 75% more flight range for all missiles, including Anomaly Generator. Perfect for beginning a fight before beginning a fight.
5 - ![]()
![]() Alpha-Inhibitor “Velox” - 30% turn rate on all axes, this is super important to make your Guard less of a flying brick and more of a deadly guided torpedo. Sure you can throw a brick straight at a glass window but what if that brick could fly around the corner and hit that glass wall? “Cheetah” is a worthwhile alternative if you’re less turning and more strafing, 75% increased strafe speed is really good. 107m/s strafe speed. Makes dodging without turning easier. If you played Elite Dangerous you might also know the up/down + turn thing to increase or decrease rotations circles around a fixed point such as an enemy.
Alpha-Inhibitor “Velox” - 30% turn rate on all axes, this is super important to make your Guard less of a flying brick and more of a deadly guided torpedo. Sure you can throw a brick straight at a glass window but what if that brick could fly around the corner and hit that glass wall? “Cheetah” is a worthwhile alternative if you’re less turning and more strafing, 75% increased strafe speed is really good. 107m/s strafe speed. Makes dodging without turning easier. If you played Elite Dangerous you might also know the up/down + turn thing to increase or decrease rotations circles around a fixed point such as an enemy.
6 - ![]()
![]()
![]() Alpha-Inhibitor “Ox” - 30% extra crit damage. This fairs extremely well with our Vulcan since Vulcan has a huge crit chance this will significantly increase its damage output across the board.
Alpha-Inhibitor “Ox” - 30% extra crit damage. This fairs extremely well with our Vulcan since Vulcan has a huge crit chance this will significantly increase its damage output across the board.
7 - ![]() Beta-Accelerator “CU - Type B” - This once again is basically the meat and bone of staying alive and being able to use all your modules at any given moment. 15% of all damage against your shields goes straight to your energy pool, this is huge, this is why we don’t need more max energy beyond what is useful to use both shield boosters and energy converter and why we don’t need more regen than we use up for boosting. You’ll get hit, a lot and you’ll have infinite amounts of energy as long as at least one enemy is looking grumpy at you making the Emergency Shield Booster usable over the full period of 20 seconds easily and thus keeping you alive and healthy.
Beta-Accelerator “CU - Type B” - This once again is basically the meat and bone of staying alive and being able to use all your modules at any given moment. 15% of all damage against your shields goes straight to your energy pool, this is huge, this is why we don’t need more max energy beyond what is useful to use both shield boosters and energy converter and why we don’t need more regen than we use up for boosting. You’ll get hit, a lot and you’ll have infinite amounts of energy as long as at least one enemy is looking grumpy at you making the Emergency Shield Booster usable over the full period of 20 seconds easily and thus keeping you alive and healthy.
8 - Beta-Accelerator “Rapidus” - 17% less recharge time on multipurpose modules. Both your Shield Booster and your Energy Converter are multipurpose modules, both of them will be ready faster making it easier for you to stay alive, allowing you to recover much faster from heavy damage and have your trump card Energy Converter ready in the right moment. Both other options are useless to you, getting disabled essentially means losing any ability to defend yourself which results in a quick death.
9 - Beta-Accelerator “SR-Mark 3” - Why take this instead of “Gigas II”? 5 points resistance less but the free addition of having all hull penetrating effects redirected to shields and absorbing all collision damage too. No ramming you to death, no alien interceptor shield penetration weapon. Show em that their pitiful damage is nothing when its redirected to your shields. Now that Shield Splitter 13 has been massively boosted to 57% more shield this is your only option. You do not want to take the ![]() Multipurpose Shields 12, you lose too much shields. Taking
Multipurpose Shields 12, you lose too much shields. Taking ![]() Multipurpose Shields 12 will make you lose 8000 shields.
Multipurpose Shields 12 will make you lose 8000 shields.
Ups:
+ Lots of ![]() hull, you can withstand quite some punishment even with your pants shields down.
hull, you can withstand quite some punishment even with your pants shields down.
+ Lots and lots of ![]() shield, unless you have massive amounts of raw firepower you’ll want to avoid… yourself because killing you takes a lot of time, you could rather just go kill that engie over there in the same time… and the other one and that one too.
shield, unless you have massive amounts of raw firepower you’ll want to avoid… yourself because killing you takes a lot of time, you could rather just go kill that engie over there in the same time… and the other one and that one too.
+ Good ![]()
![]() maneuverability for a frigate, you don’t turn like a Tai`kin but you’ll still make all the other frigates wet unless you play Ira Deus which makes Crus S wetter than wet.
maneuverability for a frigate, you don’t turn like a Tai`kin but you’ll still make all the other frigates wet unless you play Ira Deus which makes Crus S wetter than wet.
+ Incredibly fast for a frigate, 220 in combat with ![]()
![]() boost, 350+ out of combat makes even a fighter jealous.
boost, 350+ out of combat makes even a fighter jealous.
+ Extreme sustained survivability. Heck have you ever gotten hit by a full broadside Halo Launcher? I did…hit someone with it, 10k damage. You’ll never going to see these values on this thing nor will any damage you do mean anything the next 20 seconds. Getting shot at from multiple angles is your specialty, its your daily breakfast, you live in pain. You ARE the embodiment of pain.
+ Can play any coop and pvp game mode pretty effectively. Hell this thing is even good for bomb runs. Hit that booster, toggle that emergency shield booster and cruise in style introducing yourself to the enemy station with a stylish boom boom in background from all those coil mortars pearling off of your shields.
+ Very good sustained damage output, best used against destroyers and frigates.
+ Potential to one-shot anyone, including destroyers up to 2 in a row. (been there, done that). With your ungodly amount of bearable punishment you can dish out ungodly amounts of damage with your energy converter, make em pay for touching you.
+ Very versatile build allows switching up main weapons and missiles as well as some modules depending on game type without compromising the core of what makes this guard so good.
Downs:
- Requires a lot of skill both aiming and the usage of the special ability as well as a good feeling when to use your shield boosters and estimation if you can take on those enemies you’re eyeballing right now.
- High risk but high reward, this thing is a “destroy or die trying”, there’s no in between.
- Weakness against full speed built destroyers with a ![]() G’Thar’Du Cannon + Static Shield. It wont stop you but it will slow you down so hard making it increasingly more dangerous to get to the destroyer in time, approach with caution or sneak up on it. Try to get in front of it and aim the Energy Converter right at them while getting closer, this forces them to play russian roulette, either you hit and they take massive damage or they stop fighting and give you time to close in.
G’Thar’Du Cannon + Static Shield. It wont stop you but it will slow you down so hard making it increasingly more dangerous to get to the destroyer in time, approach with caution or sneak up on it. Try to get in front of it and aim the Energy Converter right at them while getting closer, this forces them to play russian roulette, either you hit and they take massive damage or they stop fighting and give you time to close in.
- Weakness against super fast, skilled interceptors. They will disable you the moment you turn on pulsar or energy converter, they will circle you harder than anyone fishing for backstabs in Dark Souls 1 and they will backflip while frontflipping while backflipfrontflipping flipping barrel rolls. DON’T ENGAGE unless you have ungodly aim and tracking skills. The only chance of winning against these is ignoring them hoping for help from others or baiting their disables with Pulsar and then using Emergency Shield Booster to survive long enough for help to arrive or Energy Converter to start a last ditch attempt at killing them. Don’t focus on them, their incredible maneuverability comes at the cost of damage (unless Tai’Kin, in that case abandon mission, abandon life)
- Requires Energy Converter to be anywhere as close to a bomber as it is supposed to be.
- You will get people telling you that Guard is OP and record videos of you one-shotting their team with the energy converter because they just can’t help themselves but shooting you even when they clearly see the red beam of insta-death and sending those to the devs who prompt it with buffing Guards even further with more resistances. No seriously, someone did it and they buffed them, thanks devs.
Game Types:
It’s great in everything except Spec Ops. Don’t use it in Spec Ops please. Sure you’ll hardly ever die but you’ll hardly be useful either, use a destroyer instead.
Game Modes:
Detonation: Play as aggressively as possible, you have hardly anything to lose. If you see a clear window, get the bomb and abuse the speed buff to no end.
Capture the Beacons: Not available.
Domination: Play aggressively when attacking points go in hard, start the battle with Energy Converter. Play extremely defensively when guarding a captured point, you alone can easily take on 2-4 in a row before needing a bit of time for shield recharge.
Team Battle: Stay with your team, try to bomb big targets, frigates and especially destroyers whenever you get the chance. Dying with a destroyer casualty on the enemy side puts more pressure on the remaining players until that player can respawn, use this to your advantage.
Beacon Hunt: Boost boost boost, be fast, be the first on a point, you are quick, abuse the speed boost and fight without mercy to your bitter end, the more people you can keep busy the easier for your team to pick off people or snack that next beacon. This is a team game after all, if you can hold your own against a group of enemies your teammates should realize that they are supposed to go snack the next beacon rather than die trying to prevent the inevitable fate that is yours.
Combat Recon: If you’re not the commander go in first, boost past all defenses, try to immediately bomb the enemy commander if you can get close enough to him. Everyone will try to stop you, you’re a big target and you want them to shoot you as soon as you are in range of the Energy Converter, wait for people to shoot at you then use the Energy Converter and nuke the commander. If you’re the commander stay behind, get cover, you are tanky and you can take incredible amounts of punishment and you can dish out much more than that but you are not invincible. Make sure at least 1-2 people have your back in case interceptor/fighter combos try to gank up on you, a good interceptor will make quick process of you if he gets to disable you for 10-20 seconds if 1-2 other people are shooting at you.
Survival: Stay behind cover, 3 times damage is super risky even for you, don’t let anyone faster than you get close to you. Make hard punishing use of the Energy Converter, keep it on cooldown, target frigates and destroyers first, they MUST die. Don’t rush in trying to bomb unless you’re very close already.
How To:
Fight with: Beyond the basics for every game type mentioned above, it is absolutely paramount that you keep track of your Shield Booster and Emergency Shield Booster cooldowns, they decide whether you can live through the battle or die. As guard it is also extremely important to know common damage types and react to incoming damage quickly or even better have your shield attuned to the correct damage type before anything can hit you. It is important to know common weapons enemies are going to use against you and it is just as much important to know the weaknesses of your own ship and skills. Any fight can turn around instantly, react fast, just because guards are slow doesn’t mean you are too.If you need repairs you can fall back a bit and recover, make sure your Shield Booster is on cooldown, then wait a few seconds and automatic hull repair will kick in. DON’T use your special ability if you don’t absolutely have to it will stop the repairs. Swapping shield attunement (using your special) will grant you a roughly 12 second speed boost that will gradually dissipate over time. One effective way to use this is boost to max speed, use your special, continue boosting until you hit 300m/s, hit special and let go of boost for a few seconds until you hit roughly under 300m/s at which point you should have regenerated enough energy to start boosting again and use your special again when hitting 300m/s with boost without loosing energy. This way you can keep cruising at 300m/s minimum all the time. Your teammates in fighters will have a stupid look on their face when they see you cruising past them in a Guard. Here’s a list of common damage types you’ll see pop up most, use these to prepare before engaging your target and if you are attuned wrong let the first hit without attunement be the last one they get on you, immediately switch shield attunements the moment you see shots coming your way that are of a different damage type.
One super essential tip : Enable damage values in your HUD options, this is the single biggest, most important thing to do, it helps you easily distinguish damage types you are receiving as they are all colored according to the damage type.
Common Damage Types
![]() EM - Is most commonly found on Destroyers, Interceptors, Thar’ga and Tai’Kin. If you see them, assume the worst. Swap to EM, if they surprise you with something else its not as bad as if they hit you with EM because EM is your worst enemy and by far the most dangerous damage type to shields, most EM weapons possess immense raw fire power.
EM - Is most commonly found on Destroyers, Interceptors, Thar’ga and Tai’Kin. If you see them, assume the worst. Swap to EM, if they surprise you with something else its not as bad as if they hit you with EM because EM is your worst enemy and by far the most dangerous damage type to shields, most EM weapons possess immense raw fire power.
![]() Thermal - Is most commonly found on Frigates, especially Long Range Frigates as well as most hard hitting guided missiles on Frigates. If you hear a missile lock in open, swap to Thermal, its most likely a Long Range Torpedo or Cruise Missile. If not, it’s not the end of the world, if you got time, check if you can see the incoming missile, the way it looks and moves can help you identify what it is. Small and fast? Most likely fighter/interceptor missile -> Kinetic. Slow and big? Most likely a cruise missile or torpedo -> Thermal. And if you get a 5 missile alert you’ll know its Kinetic.
Thermal - Is most commonly found on Frigates, especially Long Range Frigates as well as most hard hitting guided missiles on Frigates. If you hear a missile lock in open, swap to Thermal, its most likely a Long Range Torpedo or Cruise Missile. If not, it’s not the end of the world, if you got time, check if you can see the incoming missile, the way it looks and moves can help you identify what it is. Small and fast? Most likely fighter/interceptor missile -> Kinetic. Slow and big? Most likely a cruise missile or torpedo -> Thermal. And if you get a 5 missile alert you’ll know its Kinetic.
![]() Kinetic - Most commonly found on non-alien Fighters and Interceptors. Kinetic is one of the worst damage types as it is dished out in rather mediocre amounts but its a very sustained damage. Most Kinetic weapons can dish out solid damage over extended periods of time.
Kinetic - Most commonly found on non-alien Fighters and Interceptors. Kinetic is one of the worst damage types as it is dished out in rather mediocre amounts but its a very sustained damage. Most Kinetic weapons can dish out solid damage over extended periods of time.
Fight against:
I’d highly recommend calling out this guard immediately if there isn’t any more important goal on the field. Stay together but not too close, don’t hug. Try to spread out around him. Stay out of his sight and behind him as all big ships his backside is its weakness. Try to be as close as possible without sacrificing your own weapon aiming. Weapon aiming in Star Conflict is really weird, “broken” how some people would call it but it’s actually a very realistic aim and shoot model, bullets come out of your weapon turrets, not your ship this makes a huge difference when shooting, this is especially important with the Energy Converter, you can neutralize it easily by coming down to 500m and less and staying at an angle to the guard, it makes hitting the Energy Converter come down to pure luck. Watch the guard closely. Everything he does has tells. Pulsar makes a loud hissing sound, Shield Booster makes a loud sound and covers the entire shield bubble making it glow for a couple seconds, Energy Converter is kinda hard to tell as it doesn’t make any distinct sound, hence why you should keep an eye on the guard, the moment a red beam comes out of him having red particles circling around him like a shield you absolutely MUST stop firing unless you want to press your luck and risk getting one-shot. Your teammates must do the same otherwise your fate is death. You can try countering the Energy Converter with your own if you are a guard and attuned to thermal damage but beware, the enemy guard will most likely have a big hull/shield advantage by now making it extremely risky to try and bounce Energy Converter back and forth. If you are a guard swap to thermal immediately when he activates the Energy Converter and hope that he doesn’t accumulate enough damage to outright kill you or take your shields down, do some maneuvers to make it harder to hit you, again Energy Converter aiming is weird and sometimes random, no matter how perfectly you aim, sometimes it simply won’t hit but don’t rely on that. If you are a destroyer, run. RUN. Put up static shields, fire at him with everything you got until he gets close to ~3k and prepare for him to activate his Energy Converter on you the moment you fire at him, if you got warp, use it, shoot it off into the distance, angled behind him is the best as he’ll quickly loose track of the warp bubble and where it goes giving you a very short moment of surprise. While waiting for your warp to trigger, angle your camera roughly into the direction you’ll be shooting shortly after you warp. Fight as dirty as you have to and run as much as you can, this guard will kill you as destroyer without any means of preventing him from coming closer quickly ( ![]() G’Thar’Du Cannon).
G’Thar’Du Cannon).
Fight alongside:
Besides the above mentioned example of him taking all the big ouchies to his face FOR YOU, you should stay near him, help him with interceptors, he can take much more punishment than you ever will be, the longer he can take punishment rather than you the more you can do while still alive such as capturing a beacon or killing off swarming enemies. He doesn’t need particularly much help but again just for interceptors it is worth staying near him, protect him, position yourself in such a way that he takes the beating while still being able to dish out damage yourself. If you are an engineer, even better a Waz’Got and you got that magnificent WL-13 Emitter, jesus christ keep this thing on him all the time until the end of time, it is pretty self explanatory that with 1-2 WL-13 Emitters in his back and 1-2 passive hull/shield regen auras he can tank until the end of time, every missile shot at him is a wasted missile and YOU as engineer make sure that the missile damage is quickly repaired. Beware though keeping such a pesky Guard alive like this will surely anger many evil tacklers and interceptors, be prepared to defend yourself against them, let the Guard and others know that you can’t help him as you need help yourself, staying alive is just as vital as keeping him alive because if you stay alive he’ll stay alive longer too.
Anything i forgot? My conclusion: I love this build it has only 2 real weaknesses and those are extremely specific. Everything needs a counter after all, otherwise it would be truly OP right? I’ve had anything with this Guard Build, from 2 destroyer one-shots in in 4 seconds to annihilation of the entire enemy team and besides a circling, disabling interceptor and a full speed G’Thar’Du Cannon destroyer + static shields i haven’t had any ship so far that could win a 1 on 1 well… except that one guy who penetrated my shields and prompted me to switch out the extra resistance for the hull to shield damage crew which ultimately made the build even better. Thanks dude, you’ll always be in my ENERGY CONVERTER.