Developers Blog from July, 10th: Damage resistance

Welcome, pilots!

In today’s blog entry, we’d like to tell you about one of the most important aspects of the game — damage resistance.

We get quite a few questions on the topic of resistance mechanics in the game. This blog entry is devoted to analysing the issue.

To begin with, damage resistance is a separate parameter that affects the reduction of incoming damage. Resistance is calculated in arbitrary units with a formula.

In that case, if the ship has a specific type of damage resistance , the formula is as follows:

Final damage = incoming damage/(1+damage resistance value/100).

However, if the ship has no resistance to a particular type of damage, the formula changes and is as follows:

Final damage = incoming damage*(1-damage resistance value/100).

If we convert incoming damage to a percentage value depending on the ship resistance, we get the following table:


abc881c62e5de825c7b1817b7df9.png

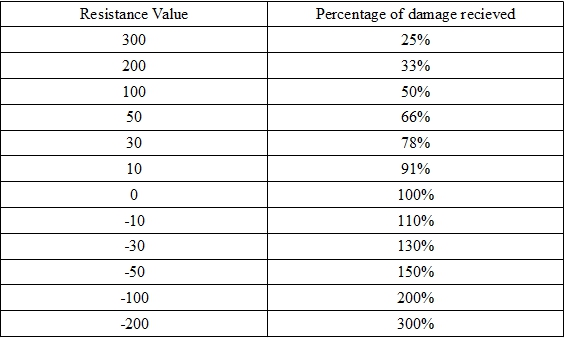
As can be seen from the table, no matter how much resistance the ship has, incoming damage will never equal zero. However, if resistance is reduced, incoming damage increases significantly.

It may give the impression that each successive unit of resistance to damage is less effective than the previous one. Yes, in terms of the resulting damage it’s correct.

The first 50 units of resistance reduce damage taken by 33% and the next 50 points (100 in total) reduce damage by a further 17% (up to 50% in total).

Some players may decide that further increasing their resistance is inefficient and it’s better to use modules increasing other parameters (such as hull strength).

But let’s look at resistance from the point of view of “ Survivability ”. By this term we mean the total amount of hull and shield strength together with damage resistance modifiers — that is, the amount of damage your ship can withstand, or, if you divide this value by the DPS value of the enemy, the time that the ship will actually survive in battle.

At the same time we will try to determine which is better: the percentage increase in hull strength or a damage resistance increase.

To do this, you need to analyse the following synthetic example:

  •  Let’s assume that your ship only has hull strength, and it’s at 10,000 pts.
  •  We have to choose what’s better to install: a module that increases hull strength by 50% or a module that increases resistance to damage by 50 pts.
    Now let’s calculate the survivability of the ship, and how much it’s actually going to live, if it is being fired upon by the enemy at 1000 damage points per second.


d765a6040ae0175d92982ef1334d.png

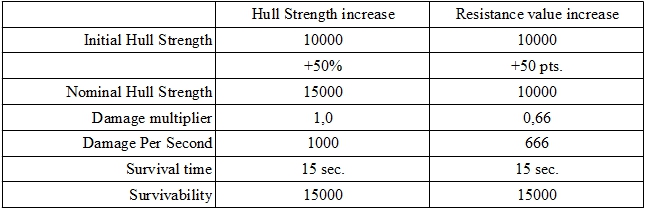
The table shows that 1 point of resistance is equal to 1% of additional hull strength from the point of view of survival.

However, let us once again make sure that the following 50 pts. of resistance are as effective as additional 50% of hull strength.


6fa53fa8e46a0e1c25a8674d4d0e.png

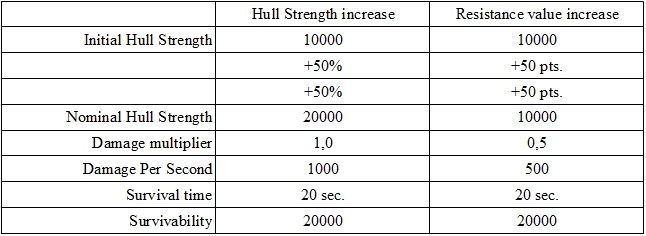
As you can see, everything checks out — 1 point of resistance is equal to 1% of additional hull strength in terms of survival.

But then the question arises: what happens if we use different modules — one to increase resistance, and the other to increase hull strength by a given percentage?


b87e52fd601bd2f4f550a146e3ef.png

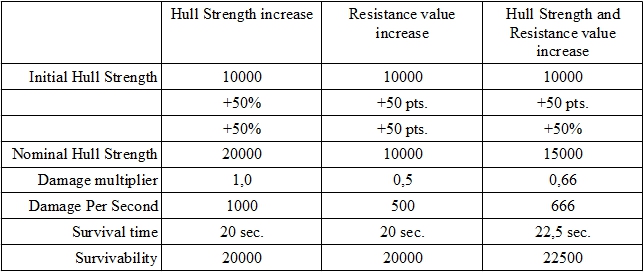
As you can see, paying attention to two areas of  ship equipment is more effective than just stacking hull strength or resistance to damage.

But let’s not stop here. After all, our game is not only about improving survivability in isolated cases, but also about interaction between players of different roles. In addition to external hull repair there’s also shield regeneration (which can also be carried out externally, in addition to the standard regeneration rate).

Let’s consider two cases of hull repair:

  • First case - weak recovery rate (50 points per second)
     

4682e067d97cb6c57a5188fcd73c.png


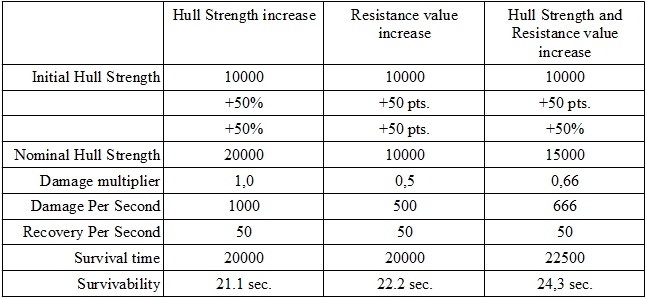
  • Second case - good recovery rate (250 points per second)
     

f37c1fd9cee6365e159b165a54ab.png

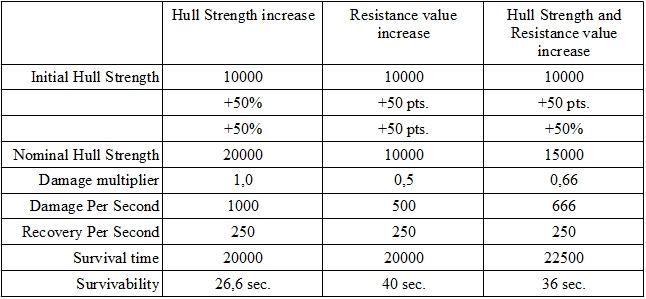
We will let you make your own conclusions here.

In addition, we would like to give the new players a few simple tips on how to improve their survivability in combat:

  • If you don’t want to die from a severe blow (missiles, mines), your survivability has to be higher than the damage that would be dealt.
  • A module that would temporarily increase hull strength does not exist, but as described above, the survival rate is increased by using two types of modifiers. Thus, in order to survive predictable alpha strikes, it is better to use passive hull and shield strength increase modules, but to improve your survivability under constant enemy fire, you have to remember to include temporary damage resistance amplifiers.
    But for the more experienced pilots we also provide additional information associated with regeneration and interaction in combat:

As you can see, simultaneously regenerating and taking damage for which you have resistance provides greater survivability. To describe this moment let’s resort to the term “effective recovery”. By this term we understood that recoverable reserve of strength that the attacker would need to overcome in order to effectively do damage to the player’s ship. This number can also be calculated by the following formula:

Effective recovery = Basic recovery*(1+damage resistance value/100)

When simultaneously regenerating and taking damage for which you have no resistance, effective recovery can be calculated by the following formula:

Effective recovery = Basic recovery/(1-damage resistance value/100)

What’s this formula for? Let’s look at an example:

— Let’s assume that a ship has hull strength of 10,000 pts. and damage resistance of 50 pts. (Survivability = 15000), in that case, each tick of the ship hull repair of 100 pts. will be calculated using the formula: 100*(1+0.5) = 150 effective healing. Thus, to effectively cause damage, the attacker would have to deal not 100 but 150 damage points.

In addition: despite the fact that more damage resistance increases the amount of effective recovery, modules for temporary increase in resistance are “bad” helpers in the repair process: they temporarily increase survivability by the same amount, as effective recovery, so the “bonus” of made up strength will be lost together with the surplus survivability.

— Modules reducing the enemy’s resistance to damage work effectively against any number of enemy resistances, despite the large numbers hovering above enemies with negative resistances. Take 2 ships with 10,000 survivability: the first vessel’s resistance is 0 and it has 10000 hull strength, the second ship’s resistance is at 100 pts.  and hull strength is at 5000. Let’s reduce their resistances by 100 and the fire a shot with 1000 damage. In the first case (100 Resistance) the ship will receive 2000 damage, in the second (0 Resistance) — 1000. In both cases, 5 shots are needed to destroy the ship.

— Modules reducing resistances also reduce the enemy’s effective recovery

— Modules increasing your damage are best used simultaneously with the resistance debuffers:

Imagine the following situation: We have 2 shots with 1000 damage and a target with 5,000 hull strength and zero resistance to damage. We can use any one shot to reduce the target’s resistance by 100 and any one shot to make it deal twice as much damage. If we do this in turns (no matter in what order), then the target will receive (1000 * 2) + (1000 * (1 - (-1))) = 4000 damage, and it will have 1000 hull strength left. If we shoot simultaneously using the two modifiers, the first shot will deal 1000 * (1 - (-1)) * 2 = 4000 damage, and the second another 1,000.

If, however, we distract ourselves from the synthetic examples with 10,000 hull strength, we have to keep in mind that ships in Star Conflict have damage resistance, not only for hulls but also for shields. And the performance of these resistances may be different. Try to experiment with them — our game gives you plenty of opportunities to modify these parameters. As this article shows, a correctly matched set of equipment can significantly increase your survivability in battle!

At this point we would like to conclude today’s blog. As always, we are looking forward to your comments!

Thanks for the formulas!


BTW, the last table in the article is in russian.

Nope, it’s not =)

Thank you, it’s always astonishing how those little-tiny things manage to slip away!

Excellent write-up - though it provides far too many people information that some of us rather have kept to ourselves  :taunt:

To do this, you need to analyse the following synthetic example:

  •  Let’s assume that your ship only has hull strength, and it’s at 10,000 pts.
  •  We have to choose what’s better to install: a module that increases hull strength by 50% or a module that increases resistance to damage by 50 pts.

There are modules that increase hull strength by 50%!? Why was I not told of this!!!

In all seriousness, now… That article has a lot of info you’d want to keep to yourself, as it, quite literally, gives away core mechanics and formulas. You really do not want to give away any game formulas… =S


Excellent write-up - though it provides far too many people information that some of us rather have kept to ourselves  

^ this, too.

Those formulas were partially figured out by players themselves and quite some time ago, so in order to give all you guys equal opportunities we wanted to make sure that everyone knows how to maximise their efficiency and survivability in battle.

Thanks a lot!

Very informative!

Excellent write-up - though it provides far too many people information that some of us rather have kept to ourselves  :taunt:


There are modules that increase hull strength by 50%!? Why was I not told of this!!!

In all seriousness, now… That article has a lot of info you’d want to keep to yourself, as it, quite literally, gives away core mechanics and formulas. You really do not want to give away any game formulas… =S


:confused:


Interesting community we have. (Yes, EvilTactician, you have a smiley, so that is not so bad ;).


About the post itself: Thanks for the info, this is a good topic!

For reference (if that wasn’t clear…), I was joking, hence the ‘Excellent write-up’ part of my reply - I knew some people would come along and complain about what’s an extremely informative post from Antibus.


I’ve had many debates on the resists topic with people over the past weeks and I’m glad he came along to provide the mathematical evidence that I was too lazy to produce myself. It takes time to write a post like that and people should be grateful for the effort.


I for one would like to see more posts such as this one.

I’ve had many debates on the resists topic with people over the past weeks and I’m glad he came along to provide the mathematical evidence that I was too lazy to produce myself. It takes time to write a post like that and people should be grateful for the effort.

I am grateful, but I feel that a part of the game core is now thrown into the open world for everyone to see. It has good and bad sides to it, tbh.


The math behind it is fairly simple to figure out for anyone who’s willing to actually try, true, but I still feel that they shouldn’t have made it public like this.


Please explain why in the earth would anyone think like that?

Please explain why in the earth would anyone think like that?

The one thing you never show the open world about a game are the Combat Formulas. This only half applies, but it’s still a part of combat.


I’m partially happy they did this because I’ve been trying to figure them out for some time, now and this proved me about 80% right (I didn’t take into account negative resists). Me and a couple friends of mine also tried to make a couple games in the past… We got severely stumped on combat formulas and gave up afterwards. This is why gaming companies value these formulas as if they were in Fort Knox. Because they’re hard to create and are worth the entire game.


That’s about it, tbh. If you can’t accept it, that’s too bad for you because that’s my personal opinion on this.

Yes, these are matters of opinion, but I was genuinely surprised by such opinion. While game source codes and important design decisions are things to keep secured, I don’t definitely see this mentioned in-game-world -related information at all like that.


With same claim that you make about resistances, we could ask why do they show how much DPS does each gun have, or how much HP does a ship hull have. Or ship speed. And most importantly, how these all behave together.


This information that was given just gives us a meaning, what does it really mean if I have 1pts of resistance. Same as if they would have explained, what does it mean if my ship has 100 DPS gun, so what does it actually mean in different scenarios, with some math and tables with examples. Especially as nothing “new” was given; Someone could have done the math involved by himself. Only new thing was to make people see, that they might not be correct in their earlier conclusions, if they haven’t considered things like HP regeneration and what is difference between receiving one big alpha instead of constant strain of damage.


Thematically, it makes more sense, that players --the space mercenaries inside the game-- know what it means to their ship and their survivability there, inside the game world, if they add “20pts of thermal resistance” to their precious ship. Instead of just thinking that, “dunno how it works and what it really does, maybe it’s magic?”.


It can also be answered by a simple line:


“The more resists you have, the less damage you’ll take but practice says you shouldn’t go over 100 resists because it’s pointless and only reduces damage by a very small amount through a logarithmic formula. Don’t know what that is? Well, just don’t bother going past 100 resist, trust the vets on this who have done the math.”


The normal train of thought is: More hp = more survivability. More hp = more buffer & more resist.

Stacking on or the other never works out in any decent game. It’s a simple assumption that even a newbie can achieve after half a dozen matches of testing.


i still see no reason to not reveal damage reduction formulas, game mechanics such as this one are important part of the game and shall be available to the community/players actively playing a game.

i still see no reason to not reveal damage reduction formulas, game mechanics such as this one are important part of the game and shall be available to the community/players actively playing a game.

If you TRY to see them, instead of having it given to you on a silver platter.

If you TRY to see them, instead of having it given to you on a silver platter.


when you come into the game you are entering a world of made up physics and rule sets, that you have to follow in order to succeed in the game. if those rule sets and mechanics are hidden from players, not explained in anyways, players will leave, thats why all these type of formulas are open in 99% of pretend to be competitive games. All those armors, resistances, damages are pointless if you have to run a science lab in order to determine yourself how they work, and guess what after that science lab? you share it with the community and everyone that participate on forums/ or just lurks will know these, so why exactly people shall waste time instead of enjoying playing? 

Or you could give us information that allows us to make informed choices rather than blunder in and waste credits (or worse, real money) to ‘learn’ the system.

I didn’t know this magical ‘fact known by everyone’ until I hit Tier 3. Before that I built my ships - ALL my ships - to have as much shield as possible with hull and shield resists coming through implants.

Having this info clear and readily available means people don’t make my mistake so often.

If you TRY to see them, instead of having it given to you on a silver platter.

I dont see why we should make a part of the game harder than it needs to be.


Good job on the easy to understand tabs Antibus, now i dont have to teach randoms in the global chat about resistances anymore, and instead refer them here.


Now, uncover the secret of optimal range that NOONE seems to know anything about (there are rumors about optimal range is 50% of max range), including error every time ive asked him. How can such a importaint thing be unknown? My entire build depends on it.

I have wondered about these numbers at start, but fitted ships for resistance or buffer anyway after how i felt it was better, but after spending 2 years in fitting tools for whole squads and spending thousands of credits for prototypes, I did not feel “robbed” by buying the fits for trial in mk1, I rather enjoyed that part.

However I heard about this information already ingame and I like the summary, which also confirms the rumors, very much, thank you!


My personal taste is to fit weaker ships for high resistance, and ships with high base values in hull/shield into buffers; This means my ceptors are omni-tanks, except my stiletto, my frigs are buffer tanks, with sometimes one sided resistance peaks, depending on their main antagonist, and the position they usually are in battle (in or out of fleet/healing support). Buffers are better against DPS, while Resistance works better against alpha damage, for short and intensive exposure, while on the long run, resistance is better for constant low dps, and buffer can withstand slow alpha strikes better, making a balanced approach better suited for random situations. At least thats my theory.